
ARMOR PROFILE

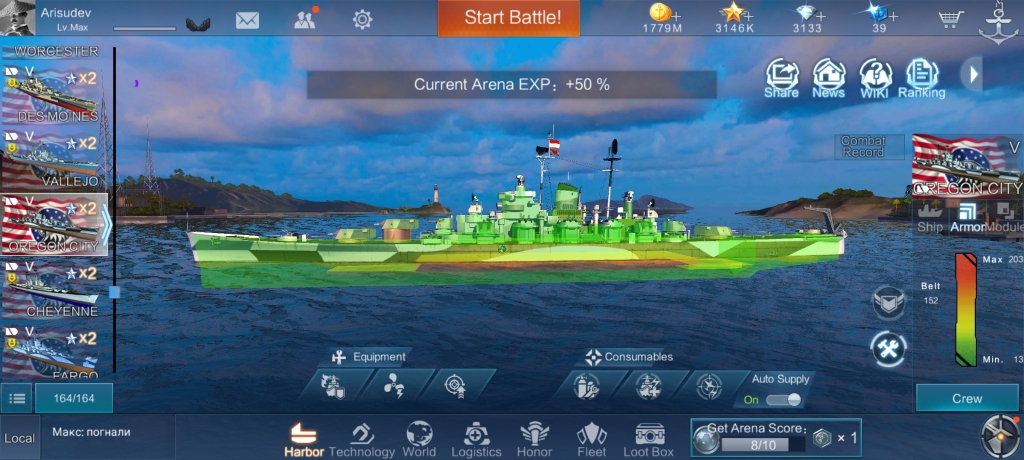
The armor profile of the ship that you own can be seen by clicking the “armor” and “module” button as shown in the pictures above. Unfortunately, only the minimum, maximum, and belt armor thickness is shown. Specific ship part’s armor thickness can’t be seen.
Bow
Bow is the front part of the ship hull. The armor thickness on the bow is usually the same as the stern, thicker than superstructure but much thinner than the belt.
Stern
Stern is the back part of the ship hull.
Citadel
Citadel is the critical part of the ship. It houses ammunition, gunpowder, fuel, machinery, and many other components that are prone to exploding. In this game, the citadel is at the bottom of the ship, extending from below the front turret to the back turret. If a shell penetrates the citadel and explodes inside it, the shell will inflict maximum damage. This is called “citadel damage” or “citadel” for short. Read more about citadel damage here. The engine is inside the citadel, so there’s a chance that if the ship gets citadeled, the engine gets broken too. Due to the potentially devastating effect of citadel damage, it’s extremely important to protect the citadel. The best way is do not show broadside.
Some ships such as German battleships have well protected citadel. They can take penetration damage but rarely citadel damage. Destroyers are impossible to be citadeled due to their thin hull. Battleship AP shells tend to overpenetrate them.
Belt
Belt is the middle part of ship hull, between bow and stern. Behind the belt is the location of citadel. Belt armor is thick compared to other parts. Some ships also have layered/turtleback-shaped armor behind the belt armor for more citadel protection. The thickness of belt armor can be seen from the armor profile.
Deck
The thickness of deck armor of low tier battleships is less than 30 mm, while the deck of MMweight 8.0+ battleships is 32 mm or higher. That’s why light cruisers can penetrate low tier battleships’ deck but not high tier battleships deck.
Most cruisers have deck armor less than 25 mm, that’s why battleships can citadel them even when angled at long range. Shells with caliber more than 380 mm can penetrate that deck and explode inside the ship.
Some high tier CVs have 50 mm or more deck armor. It’s called armored deck, a popular concept in the late WW2. That thick deck armor gives a good protection even against battleship-caliber guns.
Superstructure
Superstructure is any structure above the deck, except main guns. The thickness of superstructure is usually 20-22 mm on battleships (much thinner on other ships), that’s why even destroyers can penetrate it. However, angling can significantly increase the chance of shells bouncing on it.
Main Gun
The main gun’s armor is the thickest, even thicker than belt armor. However, the roof of the turret is usually more thinly armored.
BROADSIDE
Showing broadside (a.k.a broadsiding) means showing the side of your ship to the enemy ship. When showing broadside, the ship is very easy to get hit because it presents the biggest profile to the enemy ship. The ship is also very vulnerable to get citadeled in this position. That’s why, broadsiding is a terrible position and you should avoid broadsiding to your enemy especially at close range.
ANGLE
Angling means positioning the ship at an angle towards the enemy (45o or more). In this position the citadel is more protected and the ship presents smaller profile to the enemy ship. “Angle your ship” has the same meaning as “don’t show your broadside”. You can point the bow towards the enemy or away from the enemy.
BOWTANK
Bowtank means pointing the bow straight at the enemy. Bowtank is basically angling at ±90o towards the enemy. In this position, the ship presents very small profile to the enemy ship. Battleships and some cruisers can use this position especially when the team needs to move forward and occupy a key area. With this position, the vulnerable part of the ship (the broadside) can’t get shot at. However, there are several downsides of this position.
- Retreating is sometimes not possible. Turning your ship around will expose your broadside.
- The ship’s movement is very predictable. It’s either moving forward, stop, or reversing slowly. Just by seeing the wave beneath the ship, the enemy can easily aim. Most of the time the ship must endure damage and cannot dodge attacks.
- MAP and HE shells that has high enough penetration can inflict damage from the front. Also, AP shells that has large enough caliber can overmatch the ship’s bow armor. Read more about ammunition and overmatch here.
Due to these factors, it’s recommended to not push too far (overextending) if you’re not sure you’re going to survive. Keep a safe distance from your enemy, ideally outside of your ship’s detection range, so that you can be undetected and retreat when you need to (read more about detection below).
There’s also a position called sterntank, in which case the stern is pointed straight at the enemy. This is not popular because most ships have less guns at the rear compared to the front.
SPEED JUKE
Speed juke is altering the ship’s speed (and rudder) to dodge enemy attacks. Speed juke is an advanced technique. The ship is sailing at ¼ speed, then observe where the enemy is shooting. If the enemy shoots at the middle of the ship, immediately accelerate to full speed (use engine overload consumable if needed) so the shells hit the ocean behind the ship. If the enemy shoots at the front of the ship, immediately reverse so the shells hit the ocean in front of the ship. Alternate the rudder (angling) to increase its effectiveness. Speed juke is usually effective at medium to long range. Using engine enhancement module, artillery warning crew skill, quick shift crew skill, and advanced quick shift crew skill are the requirements for this technique.
Speed juke that’s performed while angling away from the enemy is called “kiting“. Kiting is a very powerful defensive technique. It can slow down enemy’s push and allows the ship to survive fighting multiple enemies alone. With correct angling, the ship can shoot all of its guns while still not giving the enemy any chance to hit its citadel.
If you want to see how speed juke is performed in battle, you can see an example video (complete with commentary) here.
More Naval Creed videos are available in my Youtube Channel.
DISASTER MITIGATION
Fire
A fire lasts for 45 seconds and can be extended if the enemy sets another fire on the same location. A ship can be set on fire on 4 locations. Read more about fire here. A single fire is rarely deadly. If your ship only has 1 fire, do not use damage control consumable. Especially if your ship is still under attack or will be attacked very soon. Generally, it’s better to use damage control consumable if there are 2 or more fires, or your HP is very low. Extinguishing 1 fire is only good if you are sure that you won’t be set on fire again during the damage control cooldown.
Flood
A flood lasts for 60 seconds but the damage inflicted is almost as big as 3 fires. Read more about flood here. If your ship is flooded, always use damage control consumable or else you will lose half of your HP. This is why saving damage control consumable is important. If your ship is flooded during the damage control cooldown, the effect can be disastrous.
Destroyed Modules
The main gun, torpedo tube, secondary gun, AA gun, engine, and steering gear can be damaged during the battle. Broken secondary guns and AA guns cannot be fixed (permanent). Broken main gun, torpedo tube, engine, and steering gear sometimes can be fixed (partially broken) with damage control, sometimes cannot be fixed (permanently broken).
You must use damage control consumable as soon as the engine or steering gear is broken because those are important for survival. Broken main guns or torpedo tubes are not critical, so it’s generally better to just wait until they get fixed automatically unless the enemy is going to sink you and you need to sink him first. There’s no indicator if the secondary gun or AA gun is broken, but those can’t be fixed with damage control anyway so you don’t need to think about it.
DETECTION AND CONCEALMENT
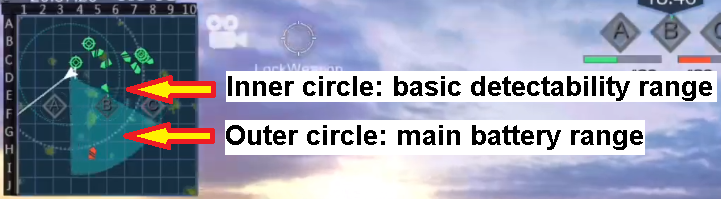
The ship can be detected by other surface ships and planes. The basic surface and air detectability range can be seen from the ship description (see the image below).

The ship’s basic detectability range can be reduced with crew skills, making it more stealthy. The detectability range of the ship will bloom after shooting (AA guns too) to a range equal or greater than the ship’s firing range for 20 seconds. After 20 seconds, the detectability range will revert to the basic detectability range. Launching torpedoes, burning, and flooding don’t increase the detectability range. The ship can also be concealed by smokescreen consumable or island. When hiding behind island, a plane or ship that has a direct line of sight can still see the ship. When hiding behind smoke, the ship can be seen with radar and underwater search consumable. The enemy can also shoot at you by tracing your shells, so be careful.
Utilizing concealment is extremely important, not just for destroyers and CVs. Ideally, you want to be able to see the enemy ship all the time and prevent them to see you. A ship that’s not detected is very hard to get shot at. That’s why it’s generally a good idea to sail outside of your ship’s detection range. When the ship is badly damaged and you need to retreat, you can stop shooting for 20 seconds and the ship will not be detected anymore unless there’s an enemy ship inside your basic detectability range. If there’s an island or smoke, you can also use it to conceal your ship.
While utilizing concealment is important, depending on the situation, being detected could be good. For example, you ship has good armor and health, while your teammate has bad armor or almost dead. You can ask your teammate to conceal themselves while you move forward to divert the enemy’s attention to you. This way, your teammate can repair and support you again later. Another example is when you’re using a battleship and the team needs to gain map control. In that situation, running away may cause your team to collapse. You should move forward carefully, use angling and speed juke, and move together with your team.
Remember, teamwork is extremely important in this game.

Leave a comment